June 29, 2011

Concentrics Summer Swag

It's that time again... Concentrics Restaurants has issued their Summer Swag!  From Monday, June 6, to Thursday, September 1, you can enjoy 50% off at any of their seven Atlanta-area restaurants.  The hard part is choosing which one to try first!

{ Just a photo, not the actual coupon.  Get yours here! }
There are a few restrictions, but not many.  Details, terms, conditions and the actual certificate to print are on their website.  { Can you tell I occasionally write legal copy at work? }

Now.  Go get your swag on.  "Take a look in the mirror, say what's up..."

{ That means you, Maude. }

June 28, 2011

The Weeknight Cook - Sausage & Vegetable Lasanga

One of my favorite shower gifts when we got married last year was this cookbook.  It's gotten more use in the last year than others I've had for a decade!  While I probably qualify as a cookbook collector, I'm definitely happy when I find one that's not just pretty... but practical.  This one's a winner on both fronts.

"The Weeknight Cook" is divided into a number of sections and bound with a three-ring binder.  Which means you can move your favorites right to the front.  No more sticky notes peeking out from the binding, like most of my other cookbooks.  With this one, I can find exactly what I want in two seconds flat.  And while some of the recipes in here are more complex than others, I've yet to come across one that's intimidating.

On Saturday, Spencer chose dinner.  And what he wanted was the first thing I ever made out of this cookbook... sausage lasagna.  I like that I can make it in three loaf pans and freeze two, instead of making one giant 9 x 13 we'd never finish.  Which means we get three meals and I only have to cook once!

The original recipe calls for 1.5 lbs of sausage, and while I know Spencer wouldn't complain about more meat, I've gotta get some veggies in there.  A few tweaks, and you have our favorite lasagna.  Some for now, some for later... and it's always good!

Sausage & Vegetable Lasagna

{ Pretend there are two zucchini here... one was hiding in the fridge. }
Ingredients
  • 2 tablespoons olive oil
  • 1 lb Italian sausage
  • 1/2 medium onion, diced
  • 2 medium squash, sliced
  • 2 medium zucchini, sliced
  • Mushrooms would be good as well, but I didn't have any on hand. : )
  • 15 oz ricotta cheese
  • 1/4 cup milk
  • 1/8 teaspoon nutmeg
  • 1 jar tomato-basil pasta sauce
  • 1 lb lasagna noodles { no-cook or traditional }
  • 1/2 cup mozzarella cheese, shredded
  • 1/2 cup parmesan cheese, grated
Primary Equipment
  • Large, deep skillet or frying pan
  • 2 medium glass bowls
  • Either (1) a 9 x 13 baking dish or (2) a glass loaf pan and 2 aluminum loaf pans
Instructions
  • Preheat oven to 400*.
  • Head 1 tablespoon of the olive oil in a large skillet over medium heat.
  • Add onion and cook, stirring often, until translucent { about 7 minutes }.
  • { If using noodles that require boiling, here's your chance to prepare them according to package directions and set aside on wax paper.  If using no-cook noodles, no additional prep is necessary. }
  • Add zucchini and squash to skillet and cook until slightly softened, an additional 5 minutes.


  • When vegetables are done, transfer from skillet to bowl and set aside.
  • Return pan to heat and add remaining tablespoon of olive oil.
  • Add sausage and saute until brown, about 10 minutes.
  • While sausage is cooking, stir ricotta, nutmeg and milk together in a bowl and set aside.
  • When sausage is finished, set aside 1/4 of meat in a bowl and reserve for use in final layer of lasanga.
  • Starting from the bottom up, assemble into your pan{s} of choice following the pattern below, without overlapping noodles.  { If using noodles that require boiling, you may need to cut them into thirds in order to fit.  One length of Ronzoni Healthy Harvest lasanga noodles will cover each layer if a loaf pan when cut into thirds.  You'll need three full lengths of Ronzoni per layer if using a 9 x 13. }

  • { If using aluminum pans to have for later, wrap tightly in aluminum foil and freeze for up to 2 months.  To reheat, bake frozen lasagna at 425* for 45 minutes covered, ten uncovered. }
  • If you're eating it tonight... cover with aluminum foil and bake for 45 minutes.  Uncover and bake ten more minutes, until cheese is golden brown and bubbly.

  • Serve warm with a chiffonade of fresh basil, if desired.
I hope you like it as much as we do.  The best part is popping one out of the freezer next week and having a homemade meal without actually having to cook!

June 27, 2011

Spicy Sweet Potato Chips

I didn't grow up eating sweet potatoes.  Mom and Dad aren't fans, so it's just one of those things I was told I wouldn't like.  Along with guacamole.  { Yum and wrong on both counts. }

Then I came across a coupon for frozen sweet potato fries.  They were delicious. But there were no more coupons to be had.  And as good as they are, they are really expensive.  { And honestly, they're not all that good for you... they are fried, after all.  } So with a little experimenting... now we make our own spicy sweet potato chips instead.  Spencer is happy because the grocery budget stays in line and I'm happy because they're quick, easy, and it's one more vegetable I can add to our repertoire.

Spicy Sweet Potato Chips

{ Shown here alongside one of our favorite Turkey Burgers }
Ingredients
  • 2 large sweet potatoes
  • 3 teaspoons olive oil
  • 1 tablespoon Cajun seasoning
  • Seasoned Salt
Equipment
  • Sharp knife
  • Cutting board
  • Food processor or mandoline (optional)
  • Large bowl
  • Teaspoon measure
  • Tablespoon measure
  • 2 baking sheets
  • Tongs or spatula
Instructions
  • Preheat oven to 400*.
  • Scrub sweet potatoes under cold running water to remove any dirt.
  • Slice off pointed ends of each sweet potato and discard.  The blunt end of the potato should be approximately 1" in diameter.
  • Using a mandoline or food processor, slice sweet potatoes into 1/4" disks.  A large, sharp knife can also be used, but I don't have a good track record with dense vegetables and sharp knives. : )  The important thing is just that the slices be the same thickness in order to cook evenly.  Slices that are too thin will burn before the others are done.
  • Toss slices with remaining ingredients in a large bowl until evenly coated.
  • Arrange slices in a single layer on { ungreased } baking sheets.  I usually need two pans.
  • Bake for ten minutes, remove from oven, and use tongs or a spatula to flip each slice.
  • Return to the oven for an additional ten minutes, or until chips are golden brown and crispy.
  • Serve warm and enjoy!

June 23, 2011

The Great Cake Debate

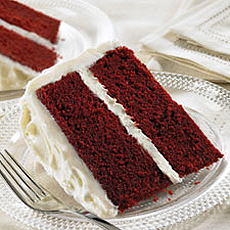
Did you know that red velvet cake is really just colored chocolate cake? { GASP. } Now, I am not so much a lover of chocolate cake.  Heresy for someone who likes to bake, I know.  I can pass up chocolate cake all day long and not bat an eye.  But put a red velvet cupcake in front of me and I can't say no.  It comes with cream cheese frosting!  Nothing that comes with cream cheese frosting can be bad.

A few girls in my office got into a debate last week regarding chocolate cake versus red velvet cake.  As the resident office-baker-wannabe, they called me in to mediate.  { Via Twitter.  While riding the shuttle bus.  I love technology. } And I'm more than happy to oblige, ladies.  This is my kind of assignment!
But how does one settle this great cake debate and determine if red velvet cake is indeed better than classic chocolate cake?  Or heck, can anyone even tell the difference?  I'm thinking that a blind taste test is in order.

I intend to bake a big ol' batch of miniature chocolate cupcakes and miniature red velvet cupcakes, both with identical cream cheese frosting.  { Please.  I paid attention in middle school science.  I know you can only test one variable at a time.  Even if my mom and sister, the teachers of the family, are probably laughing at me right now. I'm at least trying to make this legit. }

So now the question is... do we compare scratch recipes or should I use the same brand of box mix for more consistency?  What would you do? Do you have a recipe we should use? { And if you're in the office, do you want in? }

Photo Credits: Red Velvet Cake and Chocolate Cake

June 20, 2011

Sweet Daydreams

I think it's fair to say that most of us daydream about what we'd do with if we had more spare time.  I'd bet common answers are things like sleep, working out and other useful, productive things.

Me?  My daydreams most often involve butter and sugar... and preferably brown sugar.  { Sugar + Molasses = Yum. Amen and amen. } Which probably means I should be making more time to work out, not more time to bake. But then again I think everyone could use a little more butter and brown sugar in their life and I rationalize that really, I'm just trying to make the world a better place.  Everyone deserves a little something sweet.

And how about these somethings!  I will make all of these at some point soon.  I may just have to take a vacation day to do it. : )

{ Peanut Butter Cup Cupcakes by Becky Bakes }

{ Pam Anderson's Apple Upside Down Biscuits, via Pioneer Woman.  And no, not that Pam Anderson. }

{ Chocolate Chip Cookie Dough Cupcakes by Annie's Eats }
Plus, there's a dessert that's been haunting me since I went to Dallas a few weeks ago.  We ate dinner at a great little place called Hibiscus and the food was stellar.  I had the Spec Americano & Crispy Goat Cheese, followed by Texas Wagyu Bistro Steak { and a bite of a coworker's Osso Bucco, OMG } and we all shared their Icebox Pie.

Now, fancy goat cheese and Osso Bucco seems a bit out of my league.  But the Icebox Pie was unreal and far more attainable.  "Crushed Butterfinger, vanilla ice cream, Oreo cookie crust and chocolate ganache."  That I can { and will } do.  Any taste testers out there? : )

June 15, 2011

If I Were A Kid...

If I were a kid, I'd totally want this birthday party.  Or if I had a kid, I'd totally throw this birthday party.  Almost makes me want to have a kid, to throw a party like this.  { Not exactly a rational reason to bring a child into this world, I know.  Sigh.  One day I'll be ready for all that a baby brings and not just the birthday parties.  In the mean time, I'll enjoy uniterrupted sleep at night. }

Either way, cooking and parties.  My favorite things.  Yes, please!


{ Images courtesy of Hostess With The Mostess. }
I'd definitely do the giant cubby chef cutout.  And then I'd give in to the temptation to speak like the Swedish Chef.

June 6, 2011

Fried Green Tomatoes

Fried green tomatoes.  What's not to love?  The movie is a southern classic and filmed just up the road from my parents' house in Juliette, GA.  The Whistle Stop Cafe actually still stands there today.  And if you've ever seen the movie, then you'll understand why my bridesmaids gave me a roll of plastic wrap.
{ Sorry, Mom. }
Now of course, the film's namesake dish doesn't exactly get all the spotlight in the movie.  Another, shall we say, recipe does.  But when my recent visit to Macon resulted in my returning with green tomatoes... well, a girl's gotta do what a girl's gotta do.


A little research and a little experimenting later... behold!  Something I always deemed too difficult to make.  Darn good fried green tomatoes!  Panko bread crumbs make for an excellent crunch, superior to the corn meal versions in my opinion.  And Cajun seasoning gives them a good bite.


PS - if you ever visit the Whistle Stop Cafe, I might steer clear of the BBQ. :)


{ I definitely ate two before taking this picture.  Oops. }
Fabulous Fried Green Tomatoes
Yield: Appetizer-sized servings for 4
Ingredients
  • 2 large green tomatoes, ends removed, cut into 1/4" slices
  • 3/4 cup flour
  • Fresh ground black pepper
  • 1/4 teaspoon cayenne pepper
  • 1/2 teaspoon seasoned salt
  • 1 1/2 cups buttermilk
  • 1 1/2 cups plain panko { Japanese-style } bread crumbs
  • 1 tablespoon Cajun seasoning
  • 1/2 cup vegetable oil
Equipment
  • 3 medium shallow bowls
  • Cast iron skillet { or other heavy-bottomed frying pan }
  • Stainless steel tongs { plastic ones might melt! }

Directions
  1. Prepare yourself a dredging assembly line of sorts.  In first bowl, combine flour, both peppers and seasoned salt.  Pour buttermilk into a second bowl.  Then, mix bread crumbs and Cajun seasoning into a third bowl.
  2. One slice at a time, coat both sides of tomatoes in flour mixture, then buttermilk, then bread crumbs.  Pat down to ensure adequate coverage for crunch.
  3. Heat oil in skillet over medium heat to 350*.  Now if you're like me and don't have a thermometer up to the job... here's a trick.  Find a wooden spoon.  Dip just the tip of the handle in your hot oil.  If it bubbles almost immediately, you're good to go.
  4. Transfer breaded tomatoes to skillet using tongs and fry in batches, 2-3 minutes per side.  Gently remove tomatoes when done and place on paper towel-lined plate to drain.
  5. Serve warm, with goat cheese and a chiffonade of basil if desired.


Or you could just eat them straight of the paper towel-lined plate, like me.  And then call your neighbors to come get some so you don't single-handedly eat them all.  Not that I did.  Eat them all, I mean.  I did actually call the neighbors.

Now... what to do with leftover buttermilk.  Biscuits, anyone?